Mailing Approval Process
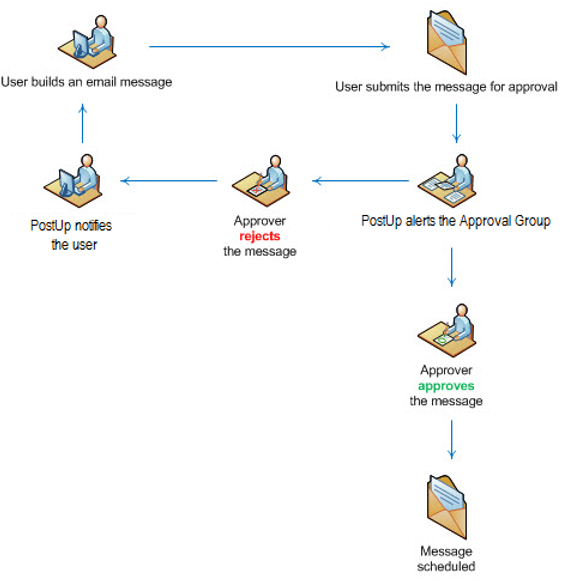
The Mailing Approval Process addresses the need to have more control over the mailings sent to subscribers. This feature provides a group of administrators, called the Approval Group, with the ability to review a mailing prior to sending it to the targeted group of recipients. In other words, the Mailing Approval Process acts as a built-in component for quality control.
Topics included:
- Creating an Approval Group
- Creating Mailing Rejection Categories
- Submitting a Mailing for Review
- Approving or Rejecting the Mailing

Note: a user’s account settings determine the user’s level of system access. Therefore, several of the options and/ or tabs may not be available to all users. Please contact your site's administrator for additional information.
Creating an Approval Group
Authorized PostUp users may create and manage their approval groups by following the steps outlined below.
- Once logged in, click on the Settings tab.
- Click on the Approval Groups link. The Approval Groups page will appear. Users may also Edit and Delete existing approval groups from this page.
- Click on Create an Approval Group. The Edit Approval Group page will appear.
- Enter the name of the approval group into the Title field.
- [optional] Enter any additional information about the approval group into the Description field.
- Select a username.
- Click on Add Approver. [Select a name and click Remove Approver to remove a user from the approval group.]
- Repeat steps 7 and 8 to add additional users to the approval group.
- Click Save.
Creating Mailing Rejection Categories
Members of the approval group will need to select a rejection category if they decide to reject a mailing back to the original user. These categories will help members of the approval group track any ongoing issues, providing them with the ability to address and fix these issues outside of the Mailing Approval Process.
- Once logged in, click on the Settings tab.
- Click on the Categories link. The Categories page will appear. Users also have the option to Edit and Delete categories from this page.
- Click on Create Category. The Create Category page will appear.
- Enter the name of the category into the Category Title field. The Category Title should reflect a reason for rejecting a mailing.
- [optional] Enter any additional information about the category into the Description field.
- Select Mailing Rejection from the Type dropdown menu.
- Click Save. The new rejection category will appear as a saved category.
Submitting a Mailing for Review
PostUp users that are not assigned to an approval group and do not have permission to bypass the approval process, will have to submit all mailings to another party to review.
- Once logged in, click on the Send tab.
- Create or edit a mailing, per normal procedure. After completing the mailing creation process, users will find an Approval Options section on the Preview & Send tab.
- Select the appropriate approval group from the Approval Group dropdown menu.
- Enter any important details regarding the mailing into the provided text field.
- Click on Submit for Approval. PostUp will display a confirmation message, stating the mailing was submitted for approval. PostUp will store the mailing under the Mailings Pending Approval section, on the Send tab, during the approval period.
Approving or Rejecting the Mailing
Once a user submits a mailing for approval, PostUp will automatically send an email notification to the members assigned to the selected approval group.
- Click on the Click Here to Approve, Reject or View link, located at the top of the email notification. PostUp will automatically redirect the user to the following page.
- PostUp may redirect you to the login page if your session expired due to inactivity. After logging into PostUp, the system will display the approval page shown above or the user can access the mailing from the Pending Approval section on the Send tab.
- Mailing Options: lists the mailing’s attributes, including targeting, tracking and testing
- HTML Content: presents the email creative
- Text Content (not shown): presents the text version of the mailing
- Select a Rejection Category (if applicable) from the dropdown menu.
- Enter additional feedback into the provided text box. You must provide additional feedback before moving onto step.
- Click on Approve or Reject.
Your may review the following from this page:
After the approval group member submits the final decision, PostUp will automatically send an email notification to the user responsible for building the message.
- If approved, PostUp will schedule and send the mailing based on the selected date and time.
- If rejected, the process will start from the beginning and the user will need to resubmit the mailing back to the approval group for a final review.